
Lab 1
Contents
- Installation of IDE
- About the Board
- Getting Started with Micropython
- Timers
- Loops
- Conditional Statements
- Data Structures
- The Story of LK: Warrior Equipped with IoT
Installation of IDE
The very first step for labs today is installation of the interactive development envirnoment you are going to use for the coding. You can download Thonny from here.
About the Board
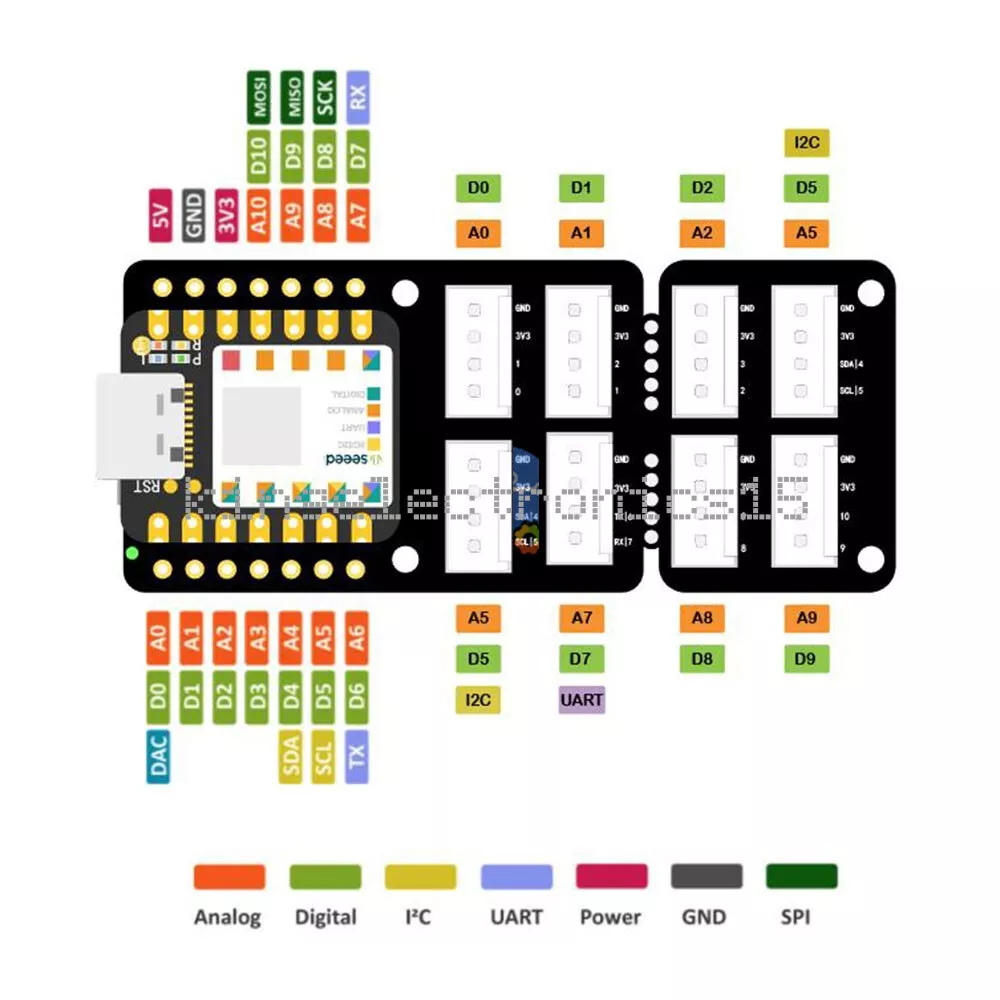
You are using ESP32S3 board with add on camera board throughout this module. The board has been pre-soldered with headers for you. You are mounting it on to the breakout board. The breakout board provides connectors allowing us to add more sensors. A very good place to start this lab is to familarise your self with pin-out and key features of the hardware. To that end, head up to the Getting Started Page here.
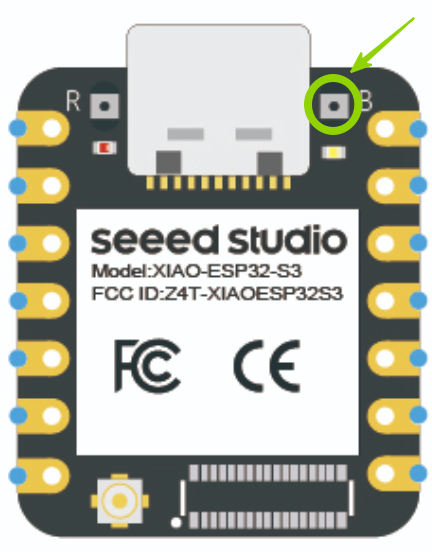
Follow the instructions on the page to setup by installing the antenna. Do not plug in before connecting the antenna. Then mount the board on the Grove expansion shield. Ensure that you have mounted right way around. See figure below:
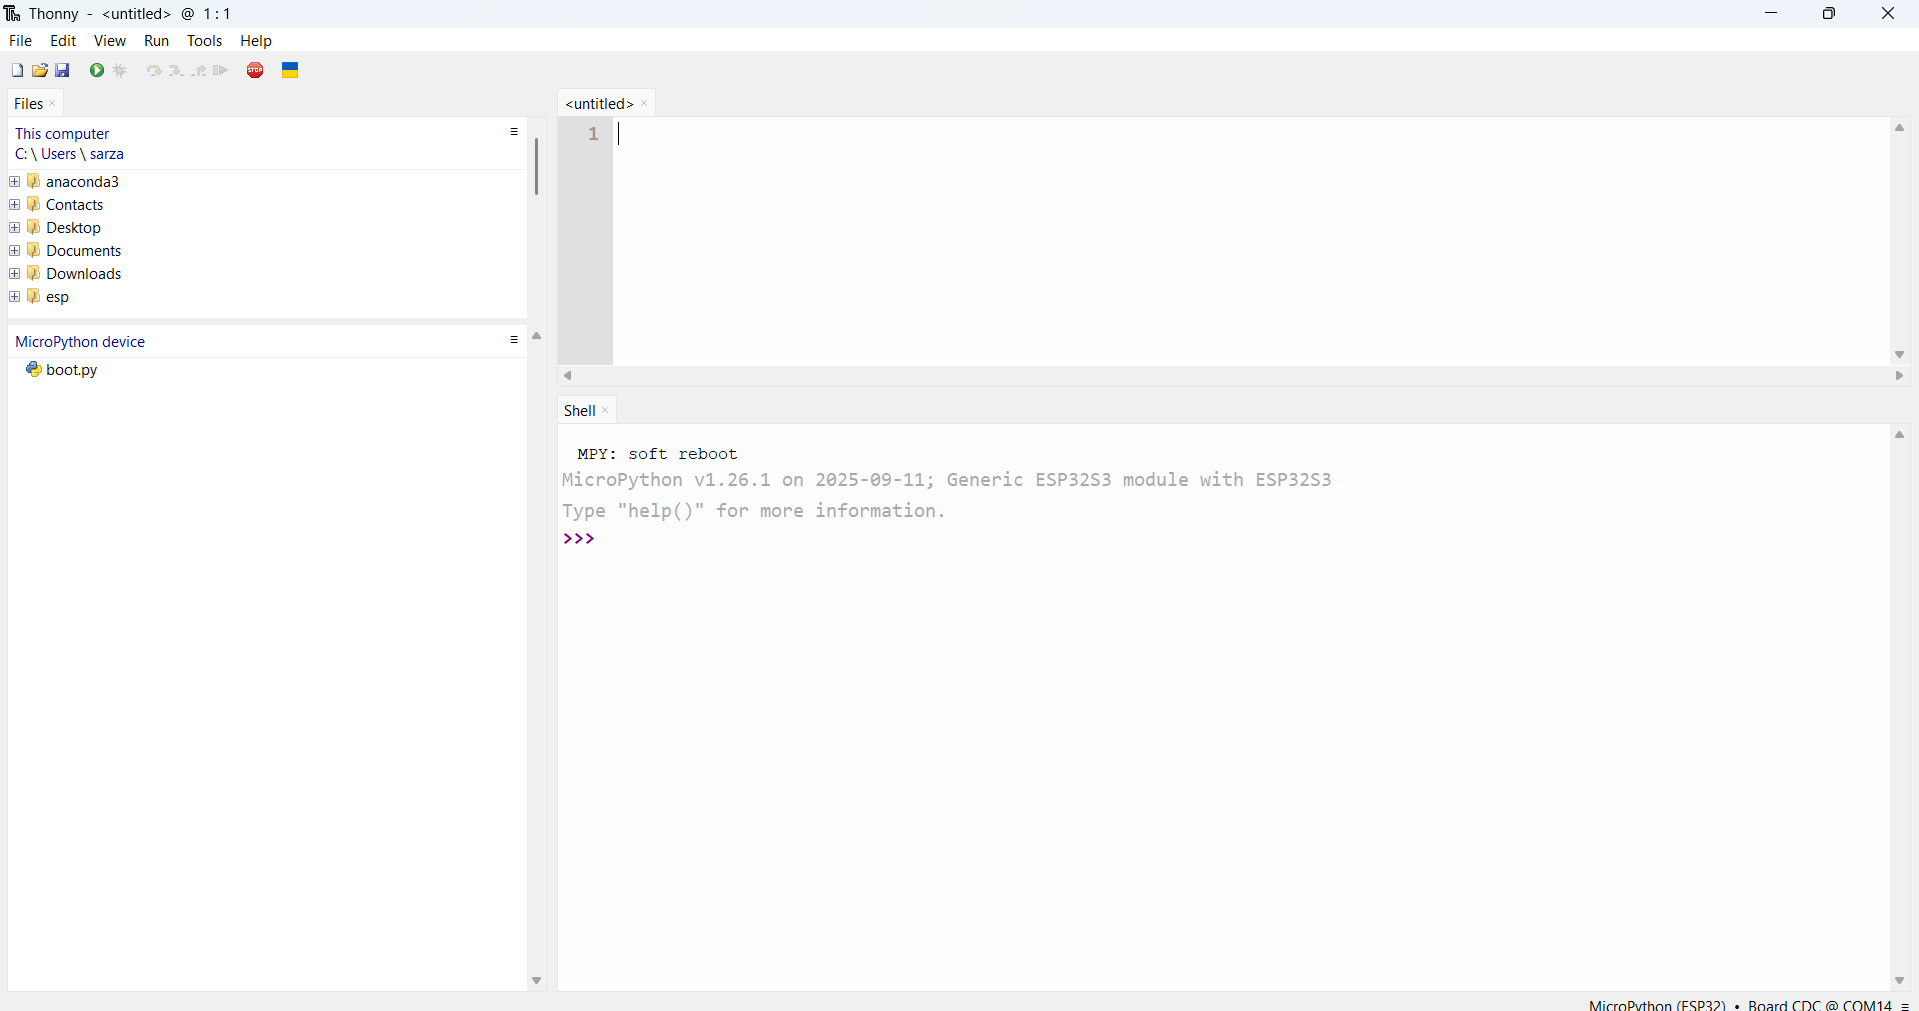
Launch Thonny IDE and ensure that your board appears at the bottom right of screen with COM port ID. After completing the installation of the Thonny IDE and ensuring the connection between ESP32S3 and your PC the next step is completing the installation of Micropython firmware on the XIAO ESP32S3 Board.
You can continue through either:
- Thonny
- Using the ESP IDF command line tool. For this option you need latest version of Python installed on the device and need to then install esptool through pip.
Sadly, we do not have administrative rights on the University computers due to security reasons. Therefore, we will use Thonny to flash the devices with Micropython firmware.
Download Firmware
Step 1: Launch MicroPython website. Click here and open in new Tab. Step 2: Click on Download option from Navigation Menu.
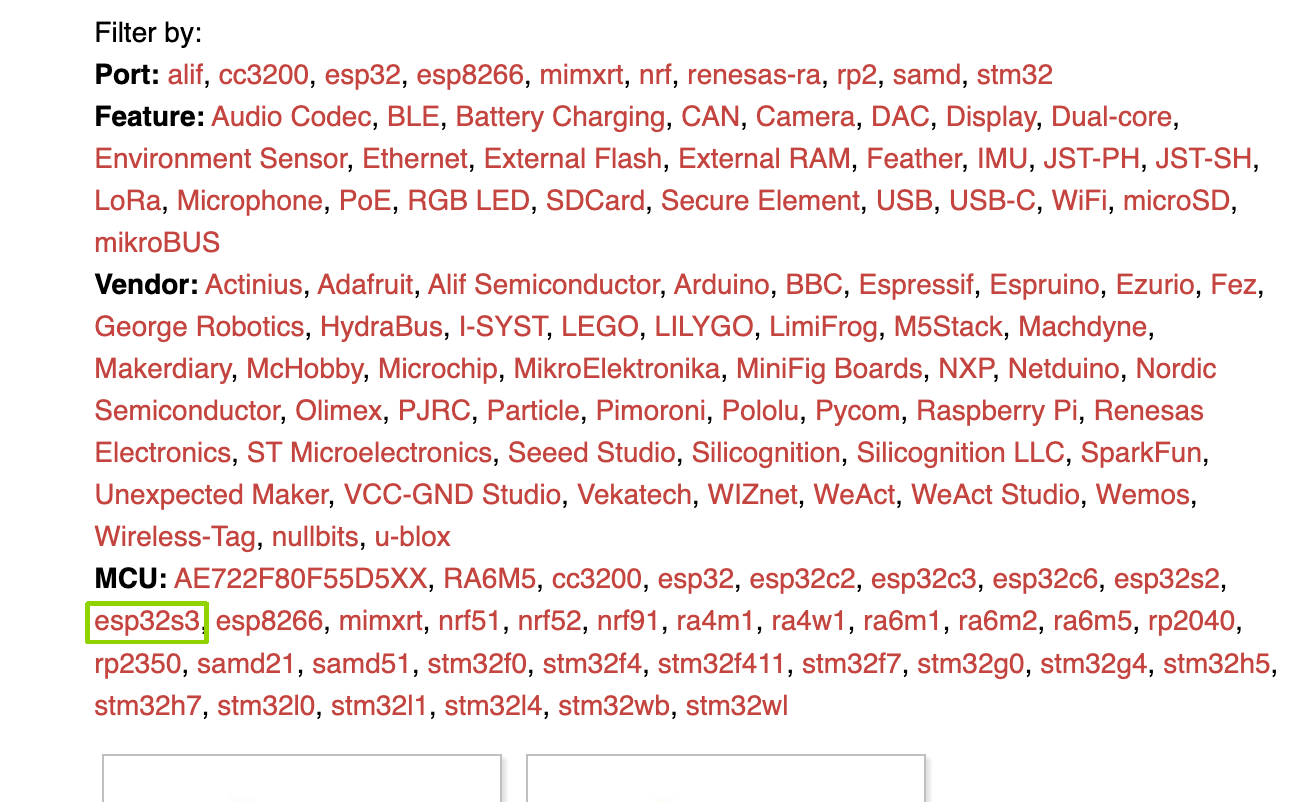
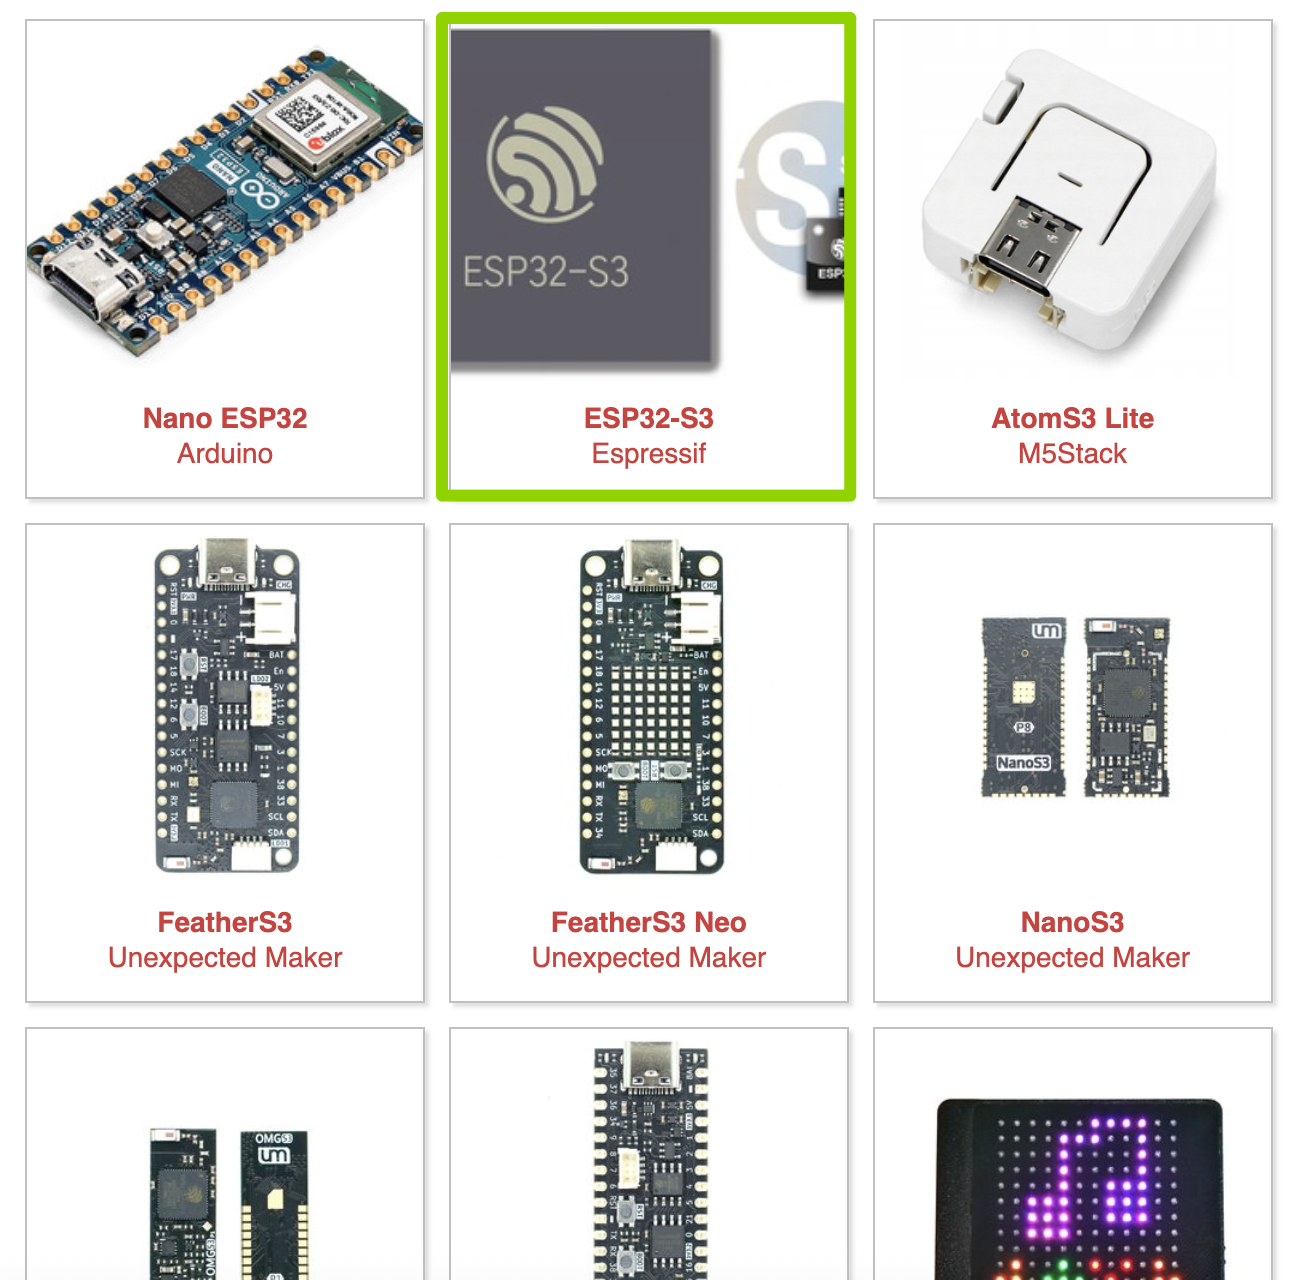
Step 3: The Download page shows, various different MCUs for which MicroPython is available. From MCU section click on esp32s3. Step 4: From options select ESP32-S3 Espressif.
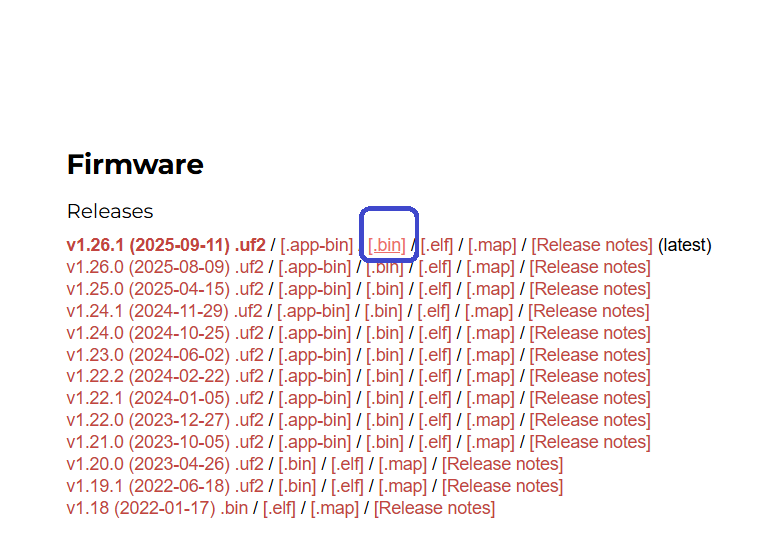
Step 5: The page should now show all the releases. From Releases section, select the latest release this is indicated in bold and is the first item on the list. Step 6: Click the link to download the firmware file named with the end of ".bin".
Bootloader Mode
We first need to put the controller in bootloader mode to install micropython firmware. The process is reversible and you can wipe the flash memory clean to remove micropython if you later decided that you wanted to code in Arduino-C for the projects. For now, its important to learn how to put the controller into bootloader mode:
- Press and hold down the BOOT button while connecting the board with a type-C USB cable provided to the computer.
- After connecting, let go of the BOOT button.
Using Thonny to Flash Firmware
Step 1: Open Thonny and click the right bottom as below and you should see a configure interpreter. Then enter configure interpreter as below.
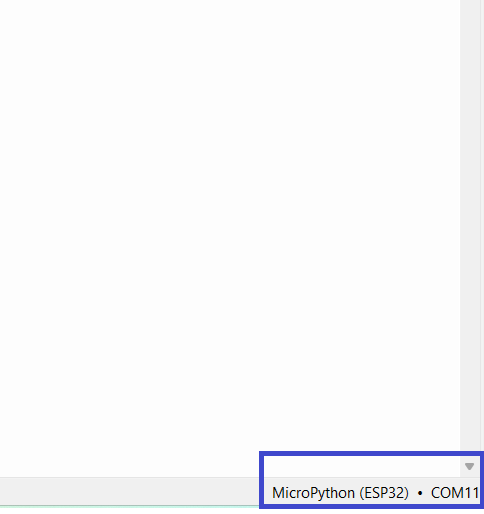
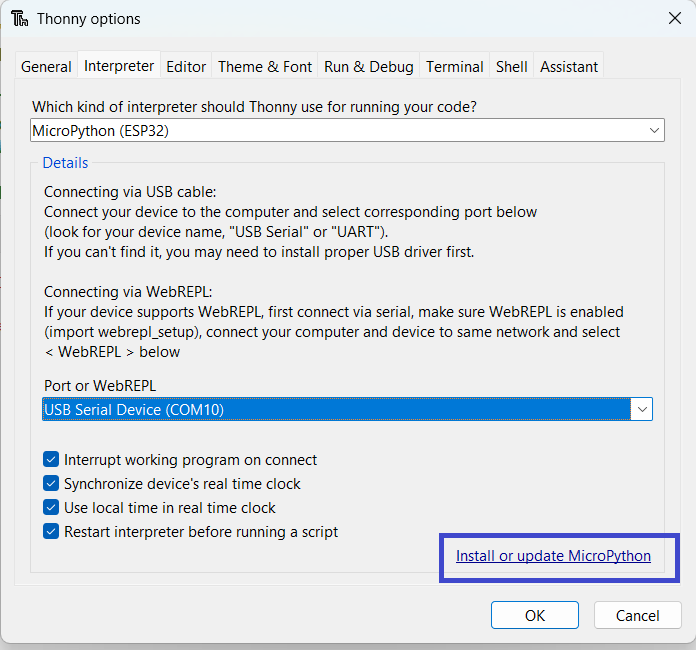
Step 2: Select "interpreter kind" as MicroPython(ESP32), and the "Port or WebREPL" as the COM Port (usbcdc.. on Mac).

Step 3: Click on Install or Update Micropython.
Step 4: Select the same COM port number from drop-down and then click Browse next to Firmware. Step 5: It seems like this depends on the version of Thonny you have. If you have the latest version your screen may look like in the figure below.
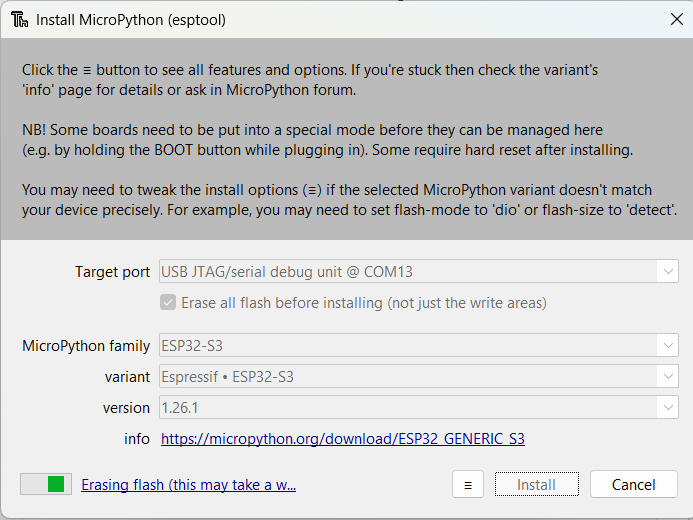
In this case, just press select the port your board is connected. Then select following parameters:
- Micropython Family: ESP32S3
- Variant: Espresif ESP32-S3
- Version: 1.26.1
Then Click Install. (Skip this if you have already done above steps using newer version) If you have older version of Thonny, you will see option to provide file for the Micropython release. In this case, navigate to where you have downloaded the ".bin" file and select it. Make sure Erase flash before installing is ticked before clicking anything else.
Step 5: Click Install. Once the process finishes, Click Close Button and then press OK button.
Step 6: Press reset button on the board. Notice these buttons are very small and can break off easily. May be use gentle press or some pointed object with blunt end to press.
Step 7: You should see click on the bottom right and select the COM Port again, the number might have changed but this is not big deal. Press Stop Button (Red Color Button in IDE). You should see the Micropython REPL (Read-Eval-Print Loop) like command prompt.
You can also do the above steps using command-line, instructions for this can be found on Seed's board page. For now, let us explore how to use the IDE.
Thony IDE Tutorial
Once you have got the MicroPython firmware on the board, you can use REPL prompt in Thonny to test Python Commands. The video below gives a quick walkthrough of basic features.
Some Key things to consider:
-
On the device boot.py is the first programme executed on boot. We will not use this so delete if there is a boot.py already on device. Most likely its empty file.
-
On the device main.py is the next programme executed after the boot.py. This is main part of your programme and is needed to be at the root of the device file-system. You can put other libraries inside the folders and use folder paths to access them from main. However, do not try to upload folders containing various labs and mains into device. At one time, there is only one main.py at root and rest of the libraries can be structured appropriately.
-
It is often best, to create a folder for each lab and name it appropriately, e.g. ELEC2302Lab1. Then browse to this folder in files tab of Thonny. If the Files Tab is not visible click, View and toggle the visibility.
-
Within this folder create a new main.py for each lab and any other files needed by your main programme.
-
In Thonny then select all files at once, this can be done by pressing Ctrl key while clicking the files. Then right click on Selcted files and press Upload to /.
-
This approach ensures you have copies of all the firmware you upload to the device locally as well. Alternatively, you may end up changing main.py on device directly and may not have the copy of updated files for later.
Some other places to find detailed account of IDE features include:
- Thonny's own website and Introductory Video
- Random Nerd's Page which is for different processor but same steps really.
- ESP32S3 Guidance.
Getting Started with Micropython
MicroPython
MicroPython is essentially Python on Keto diet. It is a lean and efficient implementation of Python, geared towards programming the embedded systems. MicroPython wields a selective arsenal, a subset of Python libraries which are required to perform necessary tasks on constrained devices.
Note
The credit for making your life easier goes to the Damien George, who developed MicroPython in 2013. The idea was to bring the high level programming language to embedded systems developers.
Blinking LED
Blinking an LED is the equivalent of "hello world" program for embedded developers. The main learning objective of this exercise is to familiarise you with input/output on embedded boards using MicroPython.
Note
I am fully aware of how dull my students find blinking bunch of LEDs. Bear with me for this lab and we will not only learn the syntax but also explore what is possible by merely blinking LEDs.
The board we are using for our labs actually only has a single USER_LED. There are Several general purpose input and output pins (GPIOs) e.g. GPIO0, GPIO1, GPIO2, GPIO3, etc. you can find from the schematic below. But if you go through the schematic, you will find only GPIO connected to the USER_LED.
For boards that have multiple LEDs, those LEDs are mainly for debugging purpose to show the status of GPIO. In order to blink any of those LEDs including the single one on our board, you just need to set the corresponding IO Pin to high or value 1, if it needs to be pulled up or alternatively low or value of 0 if it needs to be pulled down.

Let us try, following piece of code:
#import the module necessary to interact with GPIO
import machine
import time

#declaration of Pin 21 as Output Pin
myPin = machine.Pin(21, machine.Pin.OUT)

#set Pin to be high (generally this is value of 1 below so myPin.value(1) but in our case LED is connected to Vsupply and we need to ground it by passing 0)
myPin.value(0)
time.sleep_ms(10000) ## Adding some delay so we can see the LED change
Once, you have written this code in Thonny IDE, save it as main.py in the Lab folder on your computer. Then navigate to it and click Upload to / the device. You can see device files also. Then click on the main.py on device and press run button to execute.
In MicroPython, the machine module provides functions to interact with the hardware directly. Several functions provide access to hardware peripherals, e.g. timers, CPU clock, buses etc. Use this module incorrectly and it unleashes the wrath upon your hardware. Here is the link to the documentation for the details.
In the above code, all we are doing is declaring a variable which holds an instance of the Pin in this case its GPIO21. We declare this pin to be the output pin. We then set the value to 0 to make sure that Pin is connected to ground allowing LED to be turned on.
Something to try
Can you try changing myPin.value(0) to myPin.value(False) and then myPin.value(True). Before you are able to save the changes, press the red glaringly obvious stop button in Thonny IDE to stop current code in the firmware running. Can you explain in your own words, what happens when you make these changes?
Timers
Let us be honest, I promised we will blink the LED but all we have done is set the LED low. For an LED blink, we need to toggle the pin between high and low. The easiest way is to set the pin to low and then reverse state after a certain duration the wait a while to revert back to high state. Enter the realm of timers, what I mean is that now we need to bring our best friend timers into our code. Let us try the following code snippet
import machine
from machine import Pin
import time

myPin = machine.Pin(21,Pin.OUT)

while True: #Keep running this piece of code for ever
    myPin.value(0)
    time.sleep_ms(1000) #You can also use time.sleep(in sec)
    myPin.value(1)
    time.sleep_ms(1000)
Essentially, in this code we run an infinite Loop. Within this loop, we set the pin high and low with moments of nap interleaved between them. Let us further explore the syntax and type of loops available in MircoPython.
Something to Ponder
If I was to put a scope on the GPIO21, what will I observe on the scope? Can you draw this on a piece of sheet? What other instances you can think of where this waveform can be used?
Loops
Loops are programmer's best friend to simplify repetitive tasks, e.g. going through a list of objects (often stored as array/dictionary). There are different types of loop semantics once frequently encounters:
- Keep doing something till a certain condition is met
- Iterate through something or repeat the tasks for a certain number of time
This first scenario is better handled by while loop, and the second by for loop. An expert programmer can use even a single construct to do both semantic jobs but that is just showing off .Let us look at couple of examples for loops:
#initialise a variable t with some value
t = 1
for y in range(1, 5):
    t=t*y

print(t)
Let us walk through this code, we initialise a variable called t with a value 1. Then we create another variable y. We specify that range for iterating over this y variable is between 1-5, i.e. 1,2,3,4. So first iteration y is initialised as 1, second iteration its 2 and so on. Each time we multiply t with value of y and modify initial value of t to be this new value. At the end, we just print the value. Can you guess what this simple piece of code does? Yes, it calculates a 4!. So let us go ahead and see how we create a simple factorial function in MicroPython
# Let us just add function definition and add space before the first line
def factorial(a):
    t = 1
    for y in range(1, a+1):
        t=t*y
    return t

#Call the function and print whats returned directly
print(factorial(4))
Next, let us look at quick example of doing same thing but with a while loop.
#Let us define variable and the counter
t=1
y=1
while y<5:
 t=t*y
 y+=1

print(t)
Conditional Statements
Life is all about making choices, our choices take us through different pathways. The ability to make these choices is necessary for an embedded programmer. To that end, it is important to understand how to implement conditional statements which define which parts of code executes and when:
speed = 10
target = 50
if speed < target:
    print("Going at snail's pace")
elif speed > target:
    print("In a rush")
else:
    print("Keep calm and carry on")
Data Structures
Python has wonderful set of data structure. All you need to do is select appropriate ones for your task.
Lists
A data structure ordered collection of items
nList = ['4g', '5g', 'wifi', 'ble', 'nbiot']
print(nList[2])
Dictionaries
A dictionary is collection of key and value. We can use keys to find corresponding values.
address = {'IPv4':'192.168.1.0','IPv6':'None','Mac':'What is that'}
print(address['IPv4'])
Tuples
Another way to store values in a variable which cannot be changed after creation is through tuples.
color=(255,0,0)
print(color)
The Story of LK: Warrior Equipped with IoT

In the bustling metropolis of Leeds City, there exists a remarkable superhero known as LK, whose extraordinary abilities lie not in super strength or flight, but in the realm of coding and technological ingenuity. LK, whose identity remains shrouded in mystery, harnesses the power of programming to craft ingenious gadgets and tools to combat crime and protect the citizens of Leeds. Armed with a brilliant mind and an arsenal of high-tech gadgets, LK navigates the city's streets with unparalleled precision, using coding as their superpower to outwit even the most cunning adversaries. Whether it's hacking into security systems, constructing intricate devices on the fly, or analyzing data to anticipate criminal activity, LK's coding prowess knows no bounds. With each keystroke, they weave a digital tapestry of justice, ensuring that Leeds City remains safe from harm.
Throughout the rest of the labs, we will be trying to trace his steps and replicate some gadgets from his arsenal.
LK's early days
So the very first program every programmer needs to learn to write is for printing "Hello world!". This seems to be an obsession. Why is this the case? Well there is a Wikipedia article describing this, but then again LK was unconventional. His first programming stint included creating a light show on a IoT board. Luckily, you have got the same board. He started with flashing LED connected with GPIO21. The LED toggled from low to high after 100 ms. Your mission, if you choose to accept is replicating his steps. You have already done this with our help before, so this should be straight-forward.
from machine import Pin
import time

class ActiveLowPin:
    def __init__(self, pin_number):
        self.pin = Pin(pin_number, Pin.OUT)

    def value(self, val=None):
        if val is None:
            return 1 - self.pin.value()  # Return logical (inverted) state
        self.pin.value(0 if val else 1)  # Invert logic on set

    def off(self):
        self.value(0)

    def on(self):
        self.value(1)

# use ActiveLowPin instead of Pin
led = ActiveLowPin(21)

for i in range(5):
    led.off()
    time.sleep(2)
    led.on()
    time.sleep(1)
Notice that we introduced something new in the example above. Essentially, we are defining a class which inverts the logic and defines functions for turning LED on and off in correct manner.
Inventing LK's Communication System
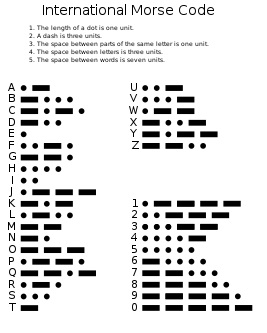
As LK grew up, he realised that this example was not much useful. Inspired by the Batman who used to merely flash his logo in the sky to enable one bit communication, the LK thought of something even more cool. May be his fondness of light-show can now turn in to creating a viable wireless communication system. A very primitive one yet a powerful example. He realised he can implement Morse Code by flashing the lights on the board. Therefore, implemented a system where any message provided by him could be transformed into Morse Code. He then started broadcasting these flashes to his friend who has smart phone with an app for decoding these messages.
Task 1
Your final mission today, if you choose to accept it, is implementing Morse code generator using the LED on the board. Store a message to be transmitted in some variable and then convert this message into Morse Code.
If you need help, try completing skeleton code below:
from machine import Pin
import time

class ActiveLowPin:
    def __init__(self, pin_number):
        self.pin = Pin(pin_number, Pin.OUT)

    def value(self, val=None):
        if val is None:
            return 1 - self.pin.value()
        self.pin.value(0 if val else 1)

    def on(self):
        self.value(1)

    def off(self):
        self.value(0)


# Use ActiveLowPin for onboard LED (active-low)
led = ActiveLowPin(21)

# Complete the code dictionary
CODE = {
    'A':'.-','B':'-...',...
}

def flashled(duration):
# Complete this function

def send(message):
    tdot = 0.12      # dot duration
    tdash = 3 * tdot # dash duration
    gap_symbol = tdot     # between elements of a letter
    gap_letter = 3 * tdot # between letters
    gap_word   = 7 * tdot # between words

    led.off()  # Ensure LED starts off

    for l in message.upper():
        if l == " ":
            # Word space
            time.sleep(gap_word)
            continue

        c = # Get appropriate code and convert to upper-case to match
        for i, e in enumerate(c):
            if e == ".":
               # Write logic to flash for dot duration
            elif e == "-":
                # Write logic for flashing for dash duration


            # Add space *between* symbols of same letter (except last one)
            if i < len(c) - 1:
                time.sleep(gap_symbol)

        # Space between letters
        time.sleep(gap_letter)

while True:
    send("HELLO WORLD")
    time.sleep(5)
If you want to check wether your Morse Code can be decoded correctly then download a Morse Code Engineer App on your smart phone and use camera to watch the decoded output.
Full Solution
from machine import Pin
import time

class ActiveLowPin:
    def __init__(self, pin_number):
        self.pin = Pin(pin_number, Pin.OUT)

    def value(self, val=None):
        if val is None:
            return 1 - self.pin.value()
        self.pin.value(0 if val else 1)

    def on(self):
        self.value(1)

    def off(self):
        self.value(0)


# Use ActiveLowPin for onboard LED (active-low)
led = ActiveLowPin(21)

CODE = {
    'A':'.-','B':'-...','C':'-.-.','D':'-..','E':'.','F':'..-.','G':'--.',
    'H':'....','I':'..','J':'.---','K':'-.-','L':'.-..','M':'--','N':'-.',
    'O':'---','P':'.--.','Q':'--.-','R':'.-.','S':'...','T':'-','U':'..-',
    'V':'...-','W':'.--','X':'-..-','Y':'-.--','Z':'--..',
    '0':'-----','1':'.----','2':'..---','3':'...--','4':'....-',
    '5':'.....','6':'-....','7':'--...','8':'---..','9':'----.',
    '.':'.-.-.-',',':'--..--','?':'..--..','/':'-..-.','@':'.--.-.',' ':' '
}

def flashled(duration):
    led.on()
    time.sleep(duration)
    led.off()

def send(message):
    tdot = 0.12      # dot duration
    tdash = 3 * tdot # dash duration
    gap_symbol = tdot     # between elements of a letter
    gap_letter = 3 * tdot # between letters
    gap_word   = 7 * tdot # between words

    led.off()  # Ensure LED starts off

    for l in message.upper():
        if l == " ":
            # Word space
            time.sleep(gap_word)
            continue

        c = CODE.get(l, "")
        for i, e in enumerate(c):
            if e == ".":
                flashled(tdot)
            elif e == "-":
                flashled(tdash)

            # Add space *between* symbols of same letter (except last one)
            if i < len(c) - 1:
                time.sleep(gap_symbol)

        # Space between letters
        time.sleep(gap_letter)

while True:
    send("HELLO WORLD")
    time.sleep(5)