
Lab 3
Contents
- Case-study
- Accelerometer
- BLE Transmission Modes
- Conectionless Setup in Micropython as Beacons
- Packing Data
- Connection-Oriented Communication using BLE GATT
- AIOBLE and Creating GATT Services
- Understanding the Code
- 1. Imports and Setup
- 2. Initialize I2C and ADXL345
- 3. Define BLE Service and Characteristic UUIDs
- 4. Register GATT Server and Characteristics
- 5. Helper Function: Encode Accelerometer Data
- 6. Sensor Task: Read and Update Characteristic
- 7. Peripheral Task: Advertise and Wait for Connections
- 8. Run All Tasks
- Visualisation
- Follow Up
Case-study
LK wants to develop a wearable sensor which is connected to a web-application. He/She wants to use the web-application to do inferencing on the data coming from the wearable. He/She must first implement functionality of wearable sensor which is capable of tracking the motion. He/She should then handle wireless connectivity between wearable sensor and the cell phone or hub device. In this lab, we will follow his foot-steps to establish the working basis for IoT connected applications and work on end-to-end workflow.
Accelerometer
Simply an accelerometer measures change in velocity with respect to an observer who is free fall. What is simply means is that when an accelerometer is static it read 0 acceleration instead of 9.8 . What we are going to use today is 3-axis digital accelerometer. [Link to Accelerometer Specs]
Note
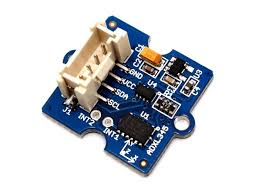
ADXL345 is a small, thin, ultra low power 3-axis accelerometer, providing high resolution (13-bit) measurement at up to ±16 g. It measures the static acceleration of gravity in tilt-sensing applications, as well as dynamic acceleration resulting from motion or shock. The ADXL345 is interfaced with the MCU using I2C Protocol.
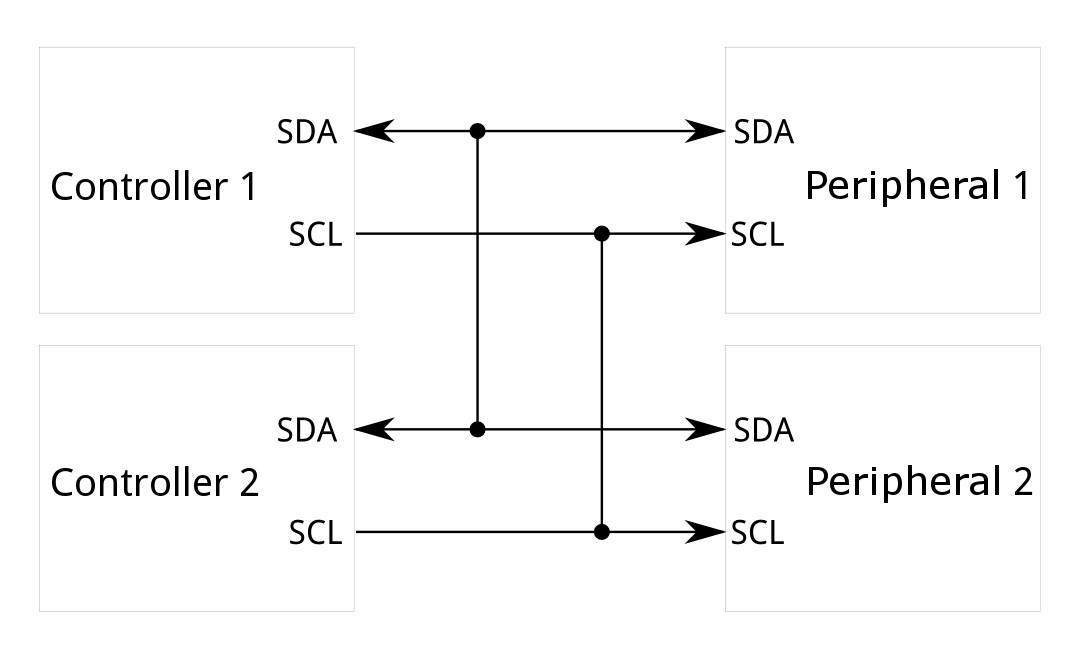
I2C Protocol
The Inter-Integrated Circuit (I2C) Protocol is intended for connecting multiple integrated chips (ICs) with a controller. The protocol is intended for short-distance communication and requires only two wires for establishing connection.
Source: Sparkfun
Connect the Accelerometer
- Before we start interfacing the accelerometer, let us first disconnect everything connected to our board. Then connect the board to Thonny and delete old files e.g. main.py etc. from the board.
- As we have done before find out which port on the Grove expansion board supports I2C protocol. By now you should be able to do this on your own. Use schematic and the pin out for the board from previous labs.
- Connect ADXL345 board to the ESP32 Grove breakout shield.
- Create a new folder on desktop for this Lab.
- Copy the code below and create a new file called accelerometer.py.
from machine import Pin,I2C
import math
import time

device = const(0x53)
regAddress = const(0x32)
TO_READ = 6
buff = bytearray(6)

class ADXL345:
    def __init__(self,i2c,addr=device):
        self.addr = addr
        self.i2c = i2c
        b = bytearray(1)
        b[0] = 0
        self.i2c.writeto_mem(self.addr,0x2d,b)
        b[0] = 16
        self.i2c.writeto_mem(self.addr,0x2d,b)
        b[0] = 8
        self.i2c.writeto_mem(self.addr,0x2d,b)

    @property
    def xValue(self):
        buff = self.i2c.readfrom_mem(self.addr,regAddress,TO_READ)
        x = (int(buff[1]) << 8) | buff[0]
        if x > 32767:
            x -= 65536
        return x

    @property
    def yValue(self):
        buff = self.i2c.readfrom_mem(self.addr,regAddress,TO_READ)
        y = (int(buff[3]) << 8) | buff[2]
        if y > 32767:
            y -= 65536
        return y

    @property
    def zValue(self):
        buff = self.i2c.readfrom_mem(self.addr,regAddress,TO_READ)
        z = (int(buff[5]) << 8) | buff[4]
        if z > 32767:
            z -= 65536
        return z

    def RP_calculate(self,x,y,z):
        roll = math.atan2(y , z) * 57.3
        pitch = math.atan2((- x) , math.sqrt(y * y + z * z)) * 57.3
        return roll,pitch
Main
In the main.py, create a thread which polls the accelerometer using following code:
from accelerometer import ADXL345

from machine import Pin, I2C
import _thread
import time
from accelerometer import ADXL345

# Initialize I2C and accelerometer
i2c = I2C(sda=Pin(5), scl=Pin(6), freq=400000)
adx = ADXL345(i2c)

# Define the thread function
def read_accelerometer():
    while True:
         x = adx.xValue
         y = adx.yValue
         z = adx.zValue
         roll, pitch = adx.RP_calculate(x, y, z)
         print("X: {:.2f}, Y: {:.2f}, Z: {:.2f}".format(x, y, z))
         time.sleep_ms(50)

# Start the thread
_thread.start_new_thread(read_accelerometer, ())

while True:
    time.sleep(1)
Personal Area Networks (PAN) using Bluetooth
Bluetooth is a wireless technology which provides connectivity for the personal area networks (PANs). The Bluetooth devices operate in 2.4 GHz ISM frequency band and have to co-exist with other incumbents e.g. WiFi and more recently LoRa. Over the decade or so the energy consumption of bluetooth devices has increased enormously. To an extent that they are becoming defacto choice for the wearable sensors. You air pods, your smart watch, your digital fitness tracker, environmental sensors at home all employ bluetooth. Learning about Bluetooth will not only enable you to use this for your own IoT projects but will also open up possibility of hacking commercially available sensors. For instance, several environmental sensor e.g. Ruuvi tag, Xiaomi Redmi temperature and humidity sensors etc. transmit data in beacon mode. You can therefore write scanner code to build your very own smart home hub with Bluetooth connectivity.
Bluetooth Low Energy (BLE) is a wireless communication technology designed for low power consumption while maintaining a similar range to classic Bluetooth.
It’s widely used in applications that require small, periodic data transfers.
Common Applications
- Health & Fitness Devices – heart rate monitors, fitness trackers
- Smart Home Sensors – thermostats, locks, lights
- IoT Devices – beacons, wearables, asset trackers
- Mobile Peripherals – wireless keyboards, earbuds, smartwatches
Key Features
- Low Energy Usage: Operates efficiently for months or years on small batteries
- Short Range: Typically 10–50 meters depending on power and environment
- Data Rate: Up to 2 Mbps (Bluetooth 5 and later)
- Network Topologies: Supports point-to-point, broadcast, and mesh networking
- Compatibility: Built into most modern smartphones and computers
BLE Generations
| Bluetooth Version | Release Year | Max Data Rate | Key Improvements |
|---|---|---|---|
| BLE 4.0 | 2010 | 1 Mbps | Introduced BLE for low-power IoT devices |
| BLE 4.1 | 2013 | 1 Mbps | Improved coexistence with LTE, better connection intervals |
| BLE 4.2 | 2014 | 1 Mbps | Larger data packets (251 bytes), privacy, IPv6 over BLE |
| BLE 5.0 | 2016 | 2 Mbps | 2M PHY, long-range Coded PHY (125/500 kbps) |
| BLE 5.1 | 2019 | 2 Mbps | Direction finding (AoA/AoD) |
| BLE 5.2 | 2020 | 2 Mbps | LE Audio, Isochronous Channels, EATT |
| BLE 5.3 | 2021 | 2 Mbps | Improved advertising, power control, channel classification |
| BLE 5.4 | 2023 | 2 Mbps | Enhanced security (PAwR), encrypted advertising, scalability |
Bluetooth Classic vs BLE
Bluetooth Classic and Bluetooth Low Energy (BLE) are two variants of the Bluetooth wireless standard. Bluetooth Classic is designed for high-throughput, continuous data streaming and is ideal for devices like headphones, speakers, and file transfer applications, but it consumes more power. BLE, on the other hand, is optimized for low-power, intermittent data transmission, making it perfect for IoT devices, fitness trackers, smart locks, and sensors that only need to send small amounts of data periodically. While BLE is energy-efficient and supports rapid connection and disconnection, Classic Bluetooth provides the sustained bandwidth necessary for audio and video streaming.
| Feature | Bluetooth Classic | BLE |
|---|---|---|
| Purpose | High-throughput, continuous streaming | Low-power, intermittent data transfer |
| Power Consumption | High (continuous connection) | Very low (mostly sleeping) |
| Data Rate | 1–3 Mbps | 125 kbps – 2 Mbps |
| Connection Time | Longer setup | Very fast setup |
| Range | 10–100 m | 10–50 m (longer with coded PHY) |
| Use Cases | Audio streaming, file transfer | IoT sensors, fitness trackers, smart locks |
| Topology | Mostly point-to-point | Point-to-point, broadcast, or mesh |
| Scenario | Recommended Bluetooth Type | Reason |
|---|---|---|
| Wireless headphones / speakers | Classic Bluetooth | Requires high bandwidth for continuous audio |
| Fitness trackers / heart rate monitors | BLE | Low power, only sends small data periodically |
| Smart locks / beacons | BLE | Efficient for small messages and long battery life |
| File transfer between devices | Classic Bluetooth | High throughput needed |
| IoT mesh networks (smart home) | BLE | Supports broadcast and mesh networking efficiently |
⚙️ Rule of Thumb: Use BLE for low-power, intermittent communication, IoT, and sensors. Use Classic Bluetooth for high-speed, continuous streaming, audio, and video devices.
BLE Transmission Modes
In Lectures, we will cover the protocol stack in details. For now, its worth considering that BLE supports two fundamentally different ways for devices to exchange information:
- Connectionless communication (broadcast / advertise & scan)
- Connection-oriented communication (establish a link, then client-server exchanges)
Each has different tradeoffs in power, flexibility, and complexity.
1. Connectionless Communication (Broadcast / Advertise & Scan)
Roles & Basics
- Devices don’t establish a dedicated connection.
- One device broadcasts data; others scan to pick it up.
- BLE roles:
- Broadcaster (Advertiser): sends advertisement packets
- Observer (Scanner): listens to receive broadcasts
How It Works
- Broadcaster / Advertiser
Sends periodic advertisement packets on three primary channels: RF37, RF38, RF39.
Payload can include device name, flags, small sensor data. - Observer / Scanner
Listens on the same advertising channels.
Receives and parses packets. - No acknowledgment
Fire-and-forget mode: no guaranteed delivery or link.
Pros / Cons & Use Cases
| Pros | Cons |
|---|---|
| Very low overhead: no handshake, no maintenance of a link | No guaranteed delivery; packets may be lost |
| Lower power usage (radio active only when advertising/scanning) | No bidirectional exchange beyond simple responses |
| Simpler logic, smaller firmware footprint | Limited data payload; no reliability mechanisms |
| Scales (“one-to-many”): many observers can pick up broadcasts | Less control and flexibility |
Use Cases:
- Beacons broadcasting identifiers
- Sensors sending periodic data
- Devices advertising presence
2. Connection-Oriented Communication (GATT / Client-Server)
Roles & Basics
- Devices adopt central and peripheral roles:
- Peripheral: battery- and resource-constrained device
- Central: capable device (e.g., smartphone)
- Data exchange happens via GATT/ATT, with one device as server and the other as client.
How It Works
Device Discovery & Link Establishment
- Peripheral advertises and listens for connection requests.
- Central scans, finds peripheral, and issues connection request.
- Link is established if peripheral accepts.
Data Exchange via GATT
- Peripheral defines hierarchy: Profile → Service → Characteristic
- Client initiates read/write requests; server responds.
- Server can send notifications or indications if subscribed.
Maintaining / Terminating Connection
- Link is maintained via supervision; either side can terminate.
Pros / Cons & Use Cases
| Pros | Cons |
|---|---|
| Reliable and structured data exchange | More overhead: connection negotiation, link maintenance |
| Supports bidirectional communication | More complex implementation |
| Better control: MTU sizes, flow control, acknowledgments | Slightly higher power use if connection is long |
| Supports more data per session | More resource use (memory, stack) |
Use Cases:
- Wearables linked to smartphones
- Smart home devices needing configuration
- Health devices requiring reliable data exchange
Comparing the Two Models
| Feature | Connectionless | Connection-Oriented |
|---|---|---|
| Setup Overhead | Low | Moderate to high |
| Reliability / ACK | None (best effort) | Yes |
| Directionality | Mostly unidirectional | Bidirectional |
| Power Consumption | Very low | Low to moderate |
| Complexity | Simple | More complex |
| Use Cases | Beacons, simple broadcasting | Wearables, smart devices, health monitoring |
Conectionless Setup in Micropython as Beacons
In this lab, we’ll build a connectionless BLE broadcaster for an ADXL345 accelerometer using MicroPython. The device continuously advertises its accelerometer readings, allowing any BLE scanner (smartphone or another BLE device) to pick up the data without forming a connection.
Key Concepts
- Connectionless BLE: Data is broadcast in advertising packets, no connection needed.
- Manufacturer Specific Data (
0xFF): Standard BLE field for arbitrary payloads. - Limitations: BLE advertising packets are limited to ~31 bytes. Here, x, y, z are packed as 2-byte integers.
MicroPython Example
from machine import Pin, I2C
import time
import _thread
from accelerometer import ADXL345
import bluetooth
import struct

# Initialize I2C and accelerometer
i2c = I2C(0, sda=Pin(5), scl=Pin(6), freq=400000)
adx = ADXL345(i2c)

# BLE Setup
ble = bluetooth.BLE()
ble.active(True)
ADV_NAME = b"AccelStreamer"

# Function to build advertising payload
def advertising_payload(name, sensor_data):
    # Complete Local Name
    name_part = bytes([len(name) + 1, 0x09]) + name
    # Manufacturer Specific Data (0xFF)
    mfg_part = bytes([len(sensor_data) + 1, 0xFF]) + sensor_data
    return name_part + mfg_part

# Start initial advertising
ble.gap_advertise(100, advertising_payload(ADV_NAME, b''))

# Thread function to read accelerometer and broadcast
def stream_accel():
    while True:
        x = adx.xValue
        y = adx.yValue
        z = adx.zValue
        roll, pitch = adx.RP_calculate(x, y, z)

        # Pack as int16 (2 bytes each)
        payload = struct.pack('<hhh', int(x*100), int(y*100), int(z*100))

        # Update advertising packet
        adv_payload = advertising_payload(ADV_NAME, payload)
        ble.gap_advertise(100, adv_payload)

        # Optional console output
        print("X: {:.2f}, Y: {:.2f}, Z: {:.2f}".format(x, y, z))
        time.sleep_ms(50)

# Start streaming thread
_thread.start_new_thread(stream_accel, ())

# Main thread can perform other tasks
while True:
    time.sleep(1)
The key features of implementation are:
- Connectionless streaming: No pairing required. Any BLE scanner can read the data.
- Manufacturer Specific Data (0xFF): Standard-compliant way to send custom data in advertising packets.
- Data size: Each accelerometer axis is packed as 2 bytes, multiplied by 100 for precision. Keep total payload ≤ 31 bytes.
- Power efficiency: BLE advertisements are very low-power, ideal for battery-powered sensors.
- Reading frequency: Adjust
time.sleep_ms(50)to balance data rate vs. power consumption. - Decoding: Scanners must know to extract the 0xFF manufacturer data and unpack the 6-byte payload into x, y, z integers.
Below is the flow chart describing how the code works:
There are couple of ways to verify that the connectionless transmissions are working.
- Download LightBlue App or Nordic NRF Connect. Use the scanning option to see the advertisement beacon you created. If you look at Manufacturer data, you would see that it gets updated.
- You can use widget below which is a Web Bluetooth implementation. The web bluetooth allows your browser to use native bluetooth drivers on OS to discover BLE devices. It does not support advertisement mode yet. Therefore, if you are on browser like Chrome/Edge, firstly you have to enable experimental flags by going to chrome://flags/#enable-experimental-web-platform-features
Once flags are enabled, you can scan using the widget below and see RSSI of the beacon. Sadly, we cannot see the data as this is not supported yet.
Advertisement RSSI Watcher
Packing Data
There are multiple ways to pack the data in the advertisement packet. There are two important aspects:
- The order in which we pack the data, i.e. for instance we can put data in packet as (x,y,z) or (z,y,x). The choice is really upto us as we will be decoding the packet elsewhere.
- The packet data fields are bytes, and the data we packed was floating point/integer numbers. How we transform these data e.g. by scaling it with known constants etc. is upto us as well.
This is what makes, several implementation proprietary. One can actual manipulate bits to interleave data. Obviously, this will complicate decoding logic but inherently protects against un-intentional decoding by malicious entities who do not know the format. Obviously this is not enough to secure data. Latest version of BLE allows encrypting the payload as well.
For the order, our previous example used arbitrary order. For packing, we used the struct to transform data into bytes. Its worth having a brief de-tour to explore two concepts, i.e., struct based packing of data and the actual payload structure of the packet.
Struct and Packing Bytes
The struct module in Python (and MicroPython) allows you to convert between Python values and binary data — essential for hardware communication, BLE, serial protocols, or reading/writing binary files.
It is used whenever you need to send numbers efficiently over Bluetooth, UART, sockets, or encode data in fixed binary formats like WAV, BMP, or sensor protocols.
Python normally works with high-level data types:
x = 3.14159
print(type(x))  # <class 'float'>
But hardware and binary protocols need raw bytes:
b'\x40\x09\x21\xfb\x54\x44\x2d\x18'
The struct module lets you pack Python numbers into bytes and unpack bytes back into Python values.
import struct

# Pack: Python values → bytes
data = struct.pack('format', values...)

# Unpack: bytes → Python values
values = struct.unpack('format', data)
The format string tells Python how to encode each value and its size.
Example:
'<iHf'
| Symbol | Meaning | Size | Example |
|---|---|---|---|
| < | Little-endian | — | BLE, ESP32, etc. |
| i | Signed 32-bit int | 4 bytes | -2147483648 → 2147483647 |
| H | Unsigned 16-bit int | 2 bytes | 0 → 65535 |
| f | 32-bit float | 4 bytes | IEEE 754 float |
The BLE Packet Format
Another thing to consider is the protocol data unit (PDU) format for BLE. Simply speaking this is your advertisement packet in the case of example, we are exploring. Let's look at the structure of a BLE advertisement packet. You can read more about the format here: Click
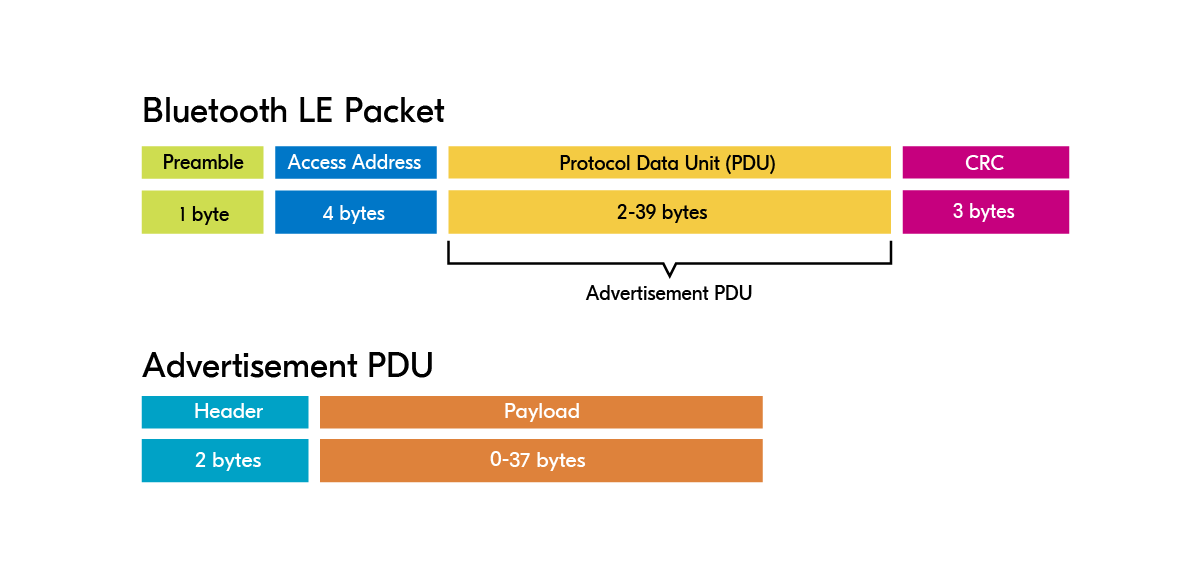
Packet Format: Source Nordic Semi-conductor
A BLE packet contains a Protocol Data Unit (PDU) which, for advertising, becomes an advertising PDU.
Header of the Advertising PDU
- PDU Type: Type of advertisement (e.g.,
ADV_IND) - RFU: Reserved for future use
- ChSel: 1 if LE Channel Selection Algorithm #2 is supported
- TxAdd: 0 or 1, public or random transmitter address
- RxAdd: 0 or 1, public or random receiver address
- Length: Length of the payload
Payload of the Advertising PDU
- AdvA: 6‑byte Bluetooth address of the advertiser
- AdvData: Advertisement data (structure depends on the advertisement type)
- For
ADV_DIRECT_IND, AdvData is replaced by a 6‑byte receiver address; no additional data
- For
To explore the packet structure in details, check the interactive demo below:
BLE Advertisement Packet
Ruuvi Tag Format 5 Example
Packet Structure
AD Structures Breakdown
Ruuvi Format 5 - Decoded Sensors
Flags Field Breakdown (0x06)
In particular the AD data has following structure
Advertisement Data Packet Structure
The AdvData field contains multiple Advertising Data (AD) Structures:
- Length: 1 byte
- AD Type: 1 byte
- AD Data: Variable length
Common AD Types:
- Complete Local Name (
BT_DATA_NAME_COMPLETE) – full device name - Shortened Local Name (
BT_DATA_NAME_SHORTENED) – short name - URI (
BT_DATA_URI) – broadcast a URL - Service UUID – identifies advertised services
- Manufacturer Specific Data (
BT_DATA_MANUFACTURER_DATA) – custom formats like iBeacon - Flags – device capabilities or modes
Flags
BT_LE_AD_LIMITED– LE Limited Discoverable ModeBT_LE_AD_GENERAL– LE General Discoverable ModeBT_LE_AD_NO_BREDR– Device does not support classic Bluetooth
One thing, you would have noticed is that I introduced the example payload using a specific format. This is called "Ruuvi Tag's" format. Ruuvi Tag sells sensors which come with temperature, humidity, accelerometer etc. These sensors transmit in connectionless mode like our example. You can check the documentation of Ruuvi tag to see how is data formatted:here. We can also adopt our code so we transmit in same format. Updated your micropython code as follows:
from machine import Pin, I2C
import time, struct, bluetooth, _thread
from accelerometer import ADXL345

# Setup
ble = bluetooth.BLE()
ble.active(True)
i2c = I2C(0, sda=Pin(5), scl=Pin(6), freq=400000)
adx = ADXL345(i2c)

RUUVI_COMPANY_ID = 0x0499
RUUVI_FORMAT = 0x05
mac = b'\xCA\xFE\xBA\xBE\x00\x01'  # static example

def ruuvi_payload(temp, hum, press, ax, ay, az, batt=3000, seq=1):
    # Temperature: 0.005°C resolution, signed
    temp_raw = int(temp * 200) & 0xFFFF

    # Humidity: 0.0025% resolution, unsigned
    hum_raw = int(hum * 400) & 0xFFFF

    # Pressure: 1 Pa resolution, unsigned, offset by 50000 Pa
    press_raw = int((press * 100) - 50000) & 0xFFFF

    # Acceleration: 1 mg resolution, signed
    ax_raw = int(ax * 1000) & 0xFFFF
    ay_raw = int(ay * 1000) & 0xFFFF
    az_raw = int(az * 1000) & 0xFFFF

    # Power info: 11 bits battery (1.6V to 3.646V), 5 bits TX power
    batt_mv = max(1600, min(3646, int(batt)))
    batt_encoded = (batt_mv - 1600) >> 4  # 11 bits
    tx_power = 4  # 0 dBm
    tx_encoded = (tx_power + 40) // 2
    pwr_info = ((batt_encoded & 0x7FF) << 5) | (tx_encoded & 0x1F)

    # Movement counter (8 bits)
    mov = seq & 0xFF

    # Measurement sequence (16 bits)
    seq16 = seq & 0xFFFF

    # Pack as big-endian
    return struct.pack('>BhhhhhhHBH6s',
        RUUVI_FORMAT,
        temp_raw,
        hum_raw,
        press_raw,
        ax_raw,
        ay_raw,
        az_raw,
        pwr_info,
        mov,
        seq16,
        mac
    )

def adv_packet(temp, hum, press, ax, ay, az, batt, seq):
    # Standard BLE Flags
    flags = bytes([2, 0x01, 0x06])

    # Manufacturer data (Company ID is little-endian per BLE spec)
    ruuvi_data = ruuvi_payload(temp, hum, press, ax, ay, az, batt, seq)
    mdata = struct.pack('<H', RUUVI_COMPANY_ID) + ruuvi_data
    mfield = bytes([len(mdata) + 1, 0xFF]) + mdata

    return flags + mfield

def get_temp():
    return 22.5

def get_hum():
    return 50.0

def get_press():
    return 1008.0

def get_batt():
    return 3100

def stream():
    seq = 0

    while True:
        seq += 1
        x, y, z = adx.xValue, adx.yValue, adx.zValue
        temp, hum, press = get_temp(), get_hum(), get_press()
        batt = get_batt()

        packet = adv_packet(temp, hum, press, x, y, z, batt, seq)

        # Update advertising with new packet (500ms interval)
        ble.gap_advertise(500, packet)

        print(f"Seq {seq}: T={temp}°C H={hum}% P={press}hPa X={x:.2f}g Y={y:.2f}g Z={z:.2f}g")
        time.sleep_ms(1000)

_thread.start_new_thread(stream, ())

while True:
    time.sleep(1)
Now we are transmitting in Ruuvi compliant format. Next go to App Store or Play Store on your phone. Install Ruuvi Station App. You will now be able to add your sensor to app and see the data coming through. Try and move the sensor and see the data change in the Ruuvi's app.
Connection-Oriented Communication using BLE GATT
BLE's GATT (Generic Attribute Profile) operates over a connection-oriented link. Understanding the underlying protocol stack is key to building robust BLE applications.
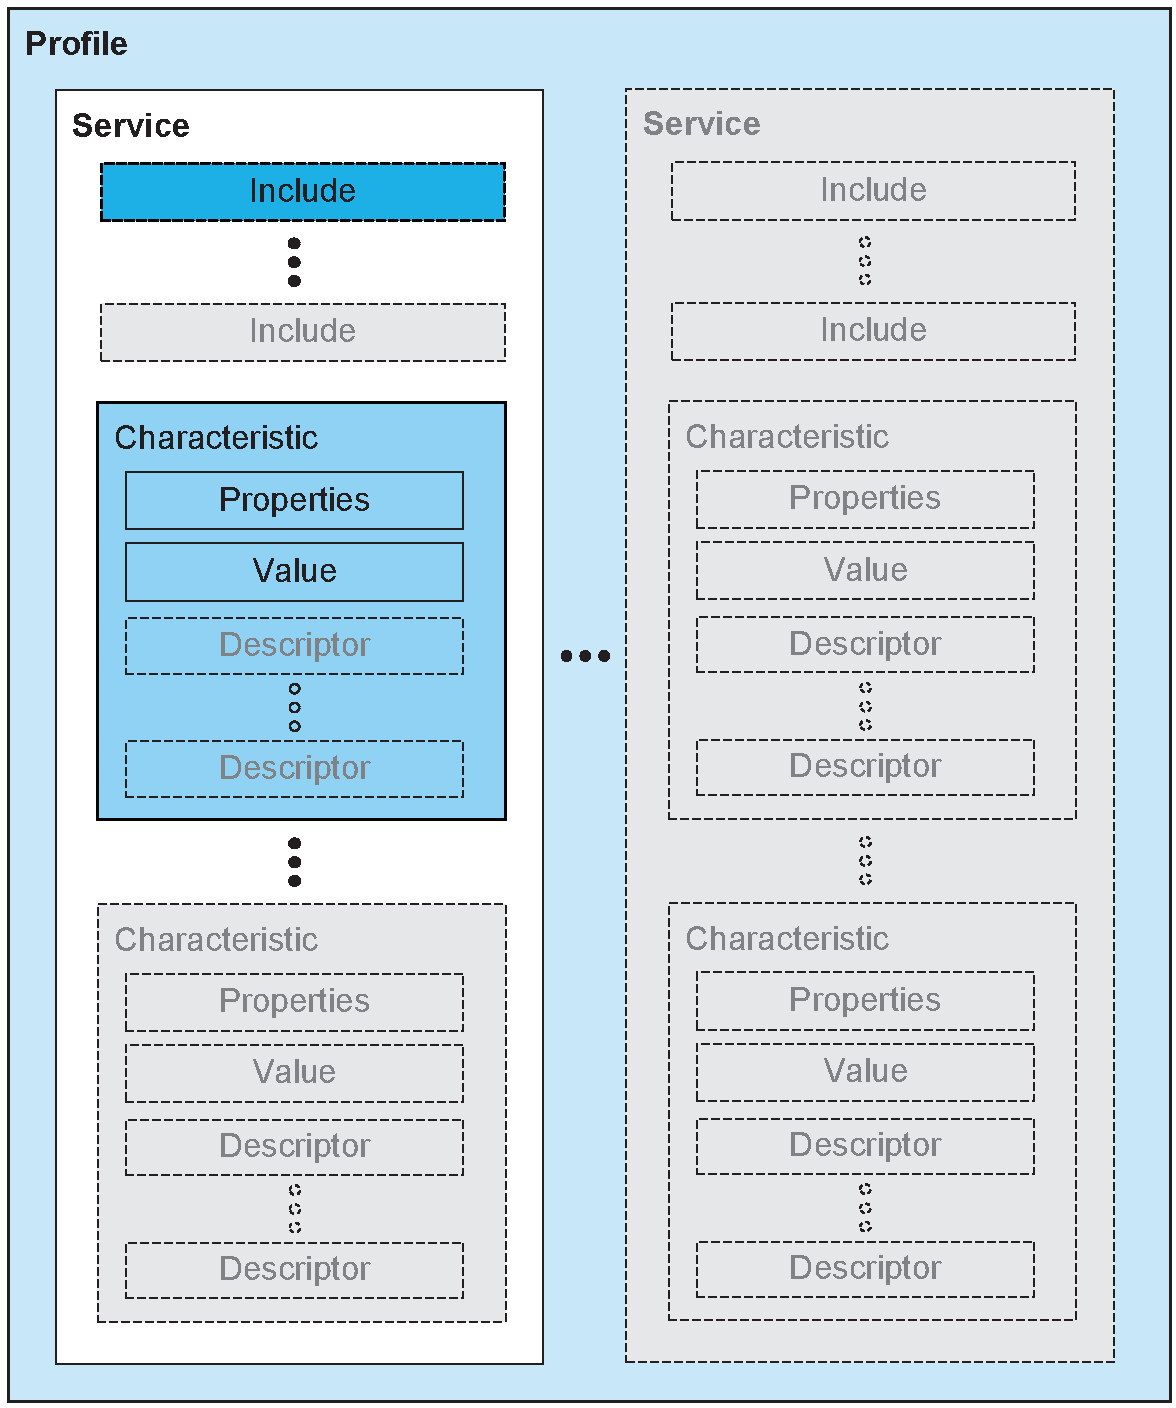
Definition
The Generic Attribute profile (GATT) defines a service framework using the Attribute Protocol. This framework defines procedures and formats of services and their characteristics. The procedures defined include discovering, reading, writing, notifying and indicating characteristics, as well as configuring the broadcast of characteristics. BLE Specification
Source: BLE Specification
-
Profile: A predefined set of services tailored for a specific use case.
-
Service: A grouping of related information, such as sensor readings, battery level, heart rate, etc.
-
Characteristic: The actual data element within the hierarchy where values are stored.
-
Descriptor: Metadata that provides additional information about a characteristic.
-
Properties: Define how a characteristic’s value can be accessed or interacted with, e.g., read, write, notify, indicate, broadcast, etc.
BLE Service
The top level of the BLE hierarchy is a profile, which is composed of one or more services. Typically, a BLE device contains multiple services, such as a Battery Service and a Heart Rate Service.
Every service contains at least one characteristic. The Bluetooth Special Interest Group (SIG) defines a number of predefined services for common data types, including:
- Battery Level
- Blood Pressure
- Heart Rate
- Weight Scale
- Environmental Sensing
You can find the complete list of predefined services here.
UUID
A UUID (Universally Unique Identifier) is a unique digital identifier used in BLE and GATT to distinguish and locate services, characteristics, and descriptors. Think of it as a distinct label that ensures every component in a Bluetooth device has a unique identity.
Each service, characteristic, and descriptor has a UUID, which is a 128-bit (16-byte) number. For example:
55072829-bc9e-4c53-938a-74a6d4c78776
There are also shortened and default UUIDs for services and characteristics specified by the SIG. Using these default UUIDs allows BLE devices to communicate in a standardized way, making it easier to read, write, or interact with data.
BLE OSI Layers Overview
BLE maps the standard OSI model differently. Here's a simplified view:
| OSI Layer | BLE Equivalent / Notes |
|---|---|
| Application | GATT/ATT – Data exposed as services/characteristics. Client reads/writes/receives notifications. |
| Presentation | Optional – Data format conventions (e.g., UTF-8 string, IEEE float). |
| Session | Optional – Handled implicitly by connection. |
| Transport | L2CAP – Multiplexes multiple channels over a single BLE link. Manages data segmentation/reassembly. |
| Network | BLE doesn’t use IP; handled by Link Layer logical addressing. |
| Data Link | Link Layer – Manages advertising, scanning, connection establishment, and low-level frame delivery. |
| Physical | RF (2.4 GHz) – Radio layer transmitting raw bits. |
Note: BLE abstracts most of the OSI layers; L2CAP and ATT/GATT are the key layers for connection-oriented communication.
BLE Connection Roles
| Role | Description |
|---|---|
| GATT Server | Exposes attributes and services (e.g., heart rate monitor) |
| GATT Client | Accesses server data (e.g., smartphone app) |
BLE requires a client-server model. The peripheral/server advertises, the central/client connects.
Connection-Oriented Setup Flow
- Link Layer: Handles advertising, connection request, channel selection.
- L2CAP: Multiplexes multiple ATT/GATT operations over a single connection.
- ATT: Attribute protocol for reading/writing characteristic values.
- GATT: Organizes attributes into services, characteristics, and descriptors.
Connection-Oriented Modes
Read Mode
Note: Client explicitly requests value. Uses ATT Read Request.
Write Mode
- Write Request: Requires acknowledgment.
- Write Command: No acknowledgment; faster but less reliable.
Notification Mode
- Notify: Unacknowledged push from server.
- Efficient for streaming sensor data.
Indication Mode
- Indicate: Server pushes data with acknowledgment.
- Recommended for critical updates.
L2CAP in BLE
L2CAP (Logical Link Control and Adaptation Protocol) provides:
- Multiplexing: Multiple ATT/GATT channels over a single BLE connection.
- Segmentation and Reassembly: Breaks large data into BLE-friendly packets ( less than 251 bytes for BLE 4.x, larger for BLE 5).
- Protocol Abstraction: Other protocols (e.g., SMP for security) can coexist on same link.
Note: Each GATT operation (read/write/notify) uses L2CAP channels to transport the data.
Dual-Role BLE Devices
Some devices act both as client and server:
- Example: A smartwatch reading a heart rate monitor (client) while exposing battery info to a phone (server).
Best Practices for Connection-Oriented BLE
- Use notifications for frequent data updates.
- Use indications for critical data requiring confirmation.
- Keep characteristics small (≤20 bytes for BLE 4.x).
- Limit the number of concurrent connections to avoid congestion.
- Always check MTU size negotiated over L2CAP for large payloads.
AIOBLE and Creating GATT Services
Now that we know about the GATT and how BLE connection oriented protocol operates. Let us re-write our code to create a service which provides the accelerometer and allows notification. Doing this with low level micropython library is difficult. So we will use a library called aioble.
- Go to Thonny IDE and in the top menu click on Tools. Then click on Manage Packages.
- Then click install to get the library.
- If installation is successfully done, you should have folder like lib within which aioble folder with all relevant files is sitting.
- Update the main.py as follows:
from micropython import const
import uasyncio as asyncio
import aioble
import bluetooth
import struct
from machine import Pin, I2C
from accelerometer import ADXL345

# --- Init I2C / Accelerometer ---
i2c = I2C(0, sda=Pin(5), scl=Pin(6), freq=400000)
adx = ADXL345(i2c)

# --- BLE UUIDs ---
_BLE_SERVICE_UUID = bluetooth.UUID('19b10000-e8f2-537e-4f6c-d104768a1214')
_BLE_SENSOR_CHAR_UUID = bluetooth.UUID('19b10001-e8f2-537e-4f6c-d104768a1214')

_ADV_INTERVAL_MS = 250_000  # advertising interval

# --- Register GATT server and characteristics ---
ble_service = aioble.Service(_BLE_SERVICE_UUID)
sensor_characteristic = aioble.Characteristic(
    ble_service, _BLE_SENSOR_CHAR_UUID, read=True, notify=True
)

aioble.register_services(ble_service)

# --- Helper to encode accelerometer data as bytes ---
def encode_accel(x, y, z):
    # Pack floats into 12 bytes, little-endian
    return struct.pack('<fff', x, y, z)

# --- Task: read ADXL and update characteristic ---
async def sensor_task():
    while True:
        x, y, z = adx.xValue, adx.yValue, adx.zValue
        sensor_characteristic.write(encode_accel(x, y, z), send_update=True)
        print(f"ADXL written: X={x:.2f}g Y={y:.2f}g Z={z:.2f}g")
        await asyncio.sleep_ms(500)

# --- Task: advertise and wait for connections ---
async def peripheral_task():
    while True:
        try:
            async with await aioble.advertise(
                _ADV_INTERVAL_MS,
                name="ESP32_ACCEL",
                services=[_BLE_SERVICE_UUID]
            ) as connection:
                print("Connection from", connection.device)
                await connection.disconnected()
        except asyncio.CancelledError:
            print("Peripheral task cancelled")
        except Exception as e:
            print("Error in peripheral_task:", e)
        finally:
            await asyncio.sleep_ms(100)

# --- Run all tasks ---
async def main():
    t1 = asyncio.create_task(sensor_task())
    t2 = asyncio.create_task(peripheral_task())
    await asyncio.gather(t1, t2)

asyncio.run(main())
Understanding the Code
Let us see what this code does:
1. Imports and Setup
from micropython import const
import uasyncio as asyncio
import aioble
import bluetooth
import struct
from machine import Pin, I2C
from accelerometer import ADXL345
Explanation:
uasyncio: Asynchronous I/O for MicroPython instead of Thread. Do self exploration of why?aioble: BLE peripheral (GATT server) library.struct: Used to pack accelerometer floats into bytes.I2CandADXL345: Initialize communication with the accelerometer.
2. Initialize I2C and ADXL345
i2c = I2C(0, sda=Pin(5), scl=Pin(6), freq=400000)
adx = ADXL345(i2c)
Explanation:
- Configures I2C on pins 5 (SDA) and 6 (SCL) at 400 kHz.
- Initializes ADXL345 accelerometer instance
adxto read X, Y, Z values.
3. Define BLE Service and Characteristic UUIDs
_BLE_SERVICE_UUID = bluetooth.UUID('19b10000-e8f2-537e-4f6c-d104768a1214')
_BLE_SENSOR_CHAR_UUID = bluetooth.UUID('19b10001-e8f2-537e-4f6c-d104768a1214')
_ADV_INTERVAL_MS = 250_000  # advertising interval
Explanation:
- Defines a unique BLE service and a sensor characteristic UUID.
_ADV_INTERVAL_MSsets the advertising interval in microseconds.
4. Register GATT Server and Characteristics
ble_service = aioble.Service(_BLE_SERVICE_UUID)
sensor_characteristic = aioble.Characteristic(
    ble_service, _BLE_SENSOR_CHAR_UUID, read=True, notify=True
)

aioble.register_services(ble_service)
Explanation:
- Creates a BLE service and a characteristic for accelerometer data.
read=True, notify=Trueallows BLE clients to read and receive live updates.- Registers the service with the BLE stack.
5. Helper Function: Encode Accelerometer Data
def encode_accel(x, y, z):
    # Pack floats into 12 bytes, little-endian
    return struct.pack('<fff', x, y, z)
Explanation:
- Converts X, Y, Z float values into 12-byte little-endian format suitable for BLE transmission.
6. Sensor Task: Read and Update Characteristic
async def sensor_task():
    while True:
        x, y, z = adx.xValue, adx.yValue, adx.zValue
        sensor_characteristic.write(encode_accel(x, y, z), send_update=True)
        print(f"ADXL written: X={x:.2f}g Y={y:.2f}g Z={z:.2f}g")
        await asyncio.sleep_ms(500)
Explanation:
- Continuously reads the accelerometer every 500 ms.
- Updates the BLE characteristic with the encoded data.
- Prints values to the console for debugging.
7. Peripheral Task: Advertise and Wait for Connections
async def peripheral_task():
    while True:
        try:
            async with await aioble.advertise(
                _ADV_INTERVAL_MS,
                name="ESP32_ACCEL",
                services=[_BLE_SERVICE_UUID]
            ) as connection:
                print("Connection from", connection.device)
                await connection.disconnected()
        except asyncio.CancelledError:
            print("Peripheral task cancelled")
        except Exception as e:
            print("Error in peripheral_task:", e)
        finally:
            await asyncio.sleep_ms(100)
Explanation:
- Advertises the ESP32 device as
"ESP32_ACCEL". - Waits for a client to connect.
- Handles disconnections and errors gracefully.
8. Run All Tasks
async def main():
    t1 = asyncio.create_task(sensor_task())
    t2 = asyncio.create_task(peripheral_task())
    await asyncio.gather(t1, t2)

asyncio.run(main())
Explanation:
- Creates two asynchronous tasks:
sensor_task: Updates accelerometer data.peripheral_task: Handles BLE advertising and connections.
- Runs both tasks concurrently using
asyncio.gather.
Visualisation
Ok, so we have got the firmware working, ideally we also want to develop a visualisation where we can read the data. Writing Apps for the smart phone is cumbersome. We prefer developing webpage which uses Web Bluetooth which can get this data. This is simple. You can host these pages into your github account. You can also add TensorFlow.JS base ML models for classification or add 3D visualisation using the Three.js. Let us start by a simple tutorial.
his tutorial shows how to create a simple web page that connects to an ESP32 running an ADXL accelerometer via Bluetooth Low Energy (BLE), and displays live X, Y, Z values.
1. Create the HTML File
Create a file called index.html:
<!DOCTYPE html>
<html lang="en">
<head>
<meta charset="UTF-8">
<title>BLE ADXL Reader</title>
<style>
  body { font-family: sans-serif; padding: 2rem; }
  button { padding: 0.5rem 1rem; font-size: 1rem; }
  #status { margin-top: 1rem; }
  #data { margin-top: 1rem; font-size: 1.2rem; }
</style>
</head>
<body>
<h1>BLE ADXL Accelerometer</h1>
<button id="connectBtn">Connect</button>

<div id="status">Status: Not connected</div>
<div id="data">X: --, Y: --, Z: --</div>

<script>
  // JavaScript code will go here
</script>
</body>
</html>
Explanation
<button>: Click to start BLE connection.<div id="status">: Shows connection status.<div id="data">: Displays X/Y/Z accelerometer values.<script>: Where we will write JavaScript.
2. Add JavaScript to Connect to BLE
Inside the <script> tag, add:
const DEVICE_NAME = "ESP32_ACCEL";
const SERVICE_UUID = '19b10000-e8f2-537e-4f6c-d104768a1214';
const CHARACTERISTIC_UUID = '19b10001-e8f2-537e-4f6c-d104768a1214';

document.getElementById('connectBtn').addEventListener('click', async () => {
    try {
        const device = await navigator.bluetooth.requestDevice({
            filters: [{ name: DEVICE_NAME }],
            optionalServices: [SERVICE_UUID]
        });

        document.getElementById('status').textContent = 'Status: Connecting...';

        const server = await device.gatt.connect();
        const service = await server.getPrimaryService(SERVICE_UUID);
        const characteristic = await service.getCharacteristic(CHARACTERISTIC_UUID);

        await characteristic.startNotifications();
        characteristic.addEventListener('characteristicvaluechanged', handleNotification);

        document.getElementById('status').textContent = 'Status: Connected';
    } catch (error) {
        console.error(error);
        document.getElementById('status').textContent = 'Status: ' + error;
    }
});

function handleNotification(event) {
    const value = event.target.value;
    if (value.byteLength < 12) return;

    const x = value.getFloat32(0, true);
    const y = value.getFloat32(4, true);
    const z = value.getFloat32(8, true);

    document.getElementById('data').textContent =
        `X: ${x.toFixed(2)} g, Y: ${y.toFixed(2)} g, Z: ${z.toFixed(2)} g`;
}
Explanation
navigator.bluetooth.requestDevice(): Opens a popup to select your BLE device.device.gatt.connect(): Connects to BLE server on ESP32.getPrimaryService()andgetCharacteristic(): Access the accelerometer data.startNotifications(): Listen for live updates automatically.handleNotification(): Reads X/Y/Z values and updates the page.
Full code
<!DOCTYPE html>
<html lang="en">
<head>
<meta charset="UTF-8">
<title>BLE ADXL Reader</title>
<style>
  body { font-family: sans-serif; padding: 2rem; }
  button { padding: 0.5rem 1rem; font-size: 1rem; }
  #status { margin-top: 1rem; }
  #data { margin-top: 1rem; font-size: 1.2rem; }
</style>
</head>
<body>
<h1>BLE ADXL Accelerometer</h1>
<button id="connectBtn">Connect</button>

<div id="status">Status: Not connected</div>
<div id="data">X: --, Y: --, Z: --</div>

<script>
const DEVICE_NAME = "ESP32_ACCEL";
const SERVICE_UUID = '19b10000-e8f2-537e-4f6c-d104768a1214';
const CHARACTERISTIC_UUID = '19b10001-e8f2-537e-4f6c-d104768a1214';

document.getElementById('connectBtn').addEventListener('click', async () => {
    try {
        // Request device by name
        const device = await navigator.bluetooth.requestDevice({
            filters: [{ name: DEVICE_NAME }],
            optionalServices: [SERVICE_UUID]
        });

        document.getElementById('status').textContent = 'Status: Connecting...';

        const server = await device.gatt.connect();
        const service = await server.getPrimaryService(SERVICE_UUID);
        const characteristic = await service.getCharacteristic(CHARACTERISTIC_UUID);

        // Enable notifications
        await characteristic.startNotifications();
        characteristic.addEventListener('characteristicvaluechanged', handleNotification);

        document.getElementById('status').textContent = 'Status: Connected';
    } catch (error) {
        console.error(error);
        document.getElementById('status').textContent = 'Status: ' + error;
    }
});

// Handle incoming notifications (12-byte float payload)
function handleNotification(event) {
    const value = event.target.value; // DataView
    if (value.byteLength < 12) return;

    const x = value.getFloat32(0, true); // little-endian
    const y = value.getFloat32(4, true);
    const z = value.getFloat32(8, true);

    document.getElementById('data').textContent =
        `X: ${x.toFixed(2)} g, Y: ${y.toFixed(2)} g, Z: ${z.toFixed(2)} g`;
}
</script>
</body>
</html>
3. Open in Browser
- Save
index.html. - Open in Google Chrome or Edge (supports Web Bluetooth).
- Click Connect, select your ESP32, and view live X/Y/Z readings.
4. Tips
- Make sure ESP32 advertises
19b10000-e8f2-537e-4f6c-d104768a1214. - Accelerometer should send 3 float32 values in little-endian.
- If the browser doesn’t see the device, use
acceptAllDevices: truefor testing.
This is a minimal, beginner-friendly BLE reader to get started with web-based sensor visualization.
Formatting and Charts
We can use third party JS libraries through CDN to add further functionality. We can also use pre-made styled components through e.g. Tailwind or Material UI to make our UI more interesting. See the above code revisited:
<!DOCTYPE html>
<html lang="en">
<head>
<meta charset="UTF-8">
<title>ESP32 ADXL Live Data</title>
<script src="https://cdn.tailwindcss.com"></script>
<script src="https://cdn.jsdelivr.net/npm/chart.js"></script>
</head>
<body class="bg-gray-100 p-6 font-sans">

<h1 class="text-3xl font-bold mb-6 text-center">ESP32 ADXL Accelerometer</h1>

<div class="text-center">
  <button id="connectBtn" class="bg-indigo-600 text-white px-4 py-2 rounded shadow hover:bg-indigo-700">
    Connect to BLE Device
  </button>
  <div id="status" class="mt-2 text-gray-700">Status: Not connected</div>
</div>

<!-- X/Y/Z Cards -->
<div class="grid grid-cols-3 gap-4 mt-6">
  <div class="bg-white p-4 rounded shadow text-center">
    <h2 class="font-semibold text-lg text-indigo-600">X</h2>
    <p id="xValue" class="text-2xl mt-2">--</p>
  </div>
  <div class="bg-white p-4 rounded shadow text-center">
    <h2 class="font-semibold text-lg text-green-600">Y</h2>
    <p id="yValue" class="text-2xl mt-2">--</p>
  </div>
  <div class="bg-white p-4 rounded shadow text-center">
    <h2 class="font-semibold text-lg text-red-600">Z</h2>
    <p id="zValue" class="text-2xl mt-2">--</p>
  </div>
</div>

<!-- Chart -->
<div class="bg-white p-4 rounded shadow mt-6">
  <canvas id="accelChart" height="200"></canvas>
</div>

<script>
const SERVICE_UUID = '19b10000-e8f2-537e-4f6c-d104768a1214';
const CHARACTERISTIC_UUID = '19b10001-e8f2-537e-4f6c-d104768a1214';

// Chart.js setup
const ctx = document.getElementById('accelChart').getContext('2d');
const chartData = {
  labels: [],
  datasets: [
    { label: 'X', borderColor: 'rgb(99, 102, 241)', data: [], fill: false },
    { label: 'Y', borderColor: 'rgb(34, 197, 94)', data: [], fill: false },
    { label: 'Z', borderColor: 'rgb(239, 68, 68)', data: [], fill: false }
  ]
};
const chartOptions = {
  animation: false,
  responsive: true,
  maintainAspectRatio: false,
  scales: { x: { display: true }, y: { beginAtZero: false, suggestedMin: -2, suggestedMax: 2 } },
  plugins: { legend: { display: true } }
};
const accelChart = new Chart(ctx, { type: 'line', data: chartData, options: chartOptions });

// BLE connect
document.getElementById('connectBtn').addEventListener('click', async () => {
  try {
    const device = await navigator.bluetooth.requestDevice({
      acceptAllDevices: true,
      optionalServices: [SERVICE_UUID]
    });
    document.getElementById('status').textContent = 'Status: Connecting...';
    const server = await device.gatt.connect();
    const service = await server.getPrimaryService(SERVICE_UUID);
    const characteristic = await service.getCharacteristic(CHARACTERISTIC_UUID);

    await characteristic.startNotifications();
    characteristic.addEventListener('characteristicvaluechanged', handleNotification);

    document.getElementById('status').textContent = 'Status: Connected to ' + device.name;
  } catch (error) {
    console.error('BLE connection error:', error);
    document.getElementById('status').textContent = 'Status: ' + error;
  }
});

// Handle notifications
function handleNotification(event) {
  const value = event.target.value;
  if (value.byteLength < 12) return;

  const x = value.getFloat32(0, true);
  const y = value.getFloat32(4, true);
  const z = value.getFloat32(8, true);

  // Update cards
  document.getElementById('xValue').textContent = x.toFixed(2);
  document.getElementById('yValue').textContent = y.toFixed(2);
  document.getElementById('zValue').textContent = z.toFixed(2);

  // Update chart
  const now = new Date().toLocaleTimeString();
  chartData.labels.push(now);
  chartData.datasets[0].data.push(x);
  chartData.datasets[1].data.push(y);
  chartData.datasets[2].data.push(z);
  if (chartData.labels.length > 50) {
    chartData.labels.shift();
    chartData.datasets.forEach(ds => ds.data.shift());
  }
  accelChart.update('none');
}
</script>
</body>
</html>
Follow Up
- Follow the JS tutorial at W3Schools: https://www.w3schools.com/js/
- Read the Tensorflow.JS Tutorial:https://www.tensorflow.org/js/tutorials
- Brush up the visualisation using Three.JS: https://threejs.org/
- Deploy the pages you created into github as github.io webpages.
- Add some basic processing capabilities in the page, e.g. calculate Roll and Pitch as derived features for ML.